Warehouse & Put-Away
Organize your physical warehouse with locations and pallets, and track where every item is stored.
org-admin team-lead scannerListerLeo's warehouse module lets you define your physical storage layout and track the exact location of every item. This is critical for efficient picking — when an item sells, your pickers need to know exactly where to find it.
Warehouse Concepts
- Warehouse — A physical building. Every org gets a default "Main Warehouse" on signup, and you can add more under Warehouse > Warehouses. Exactly one warehouse per org is flagged as the default — that is where put-away and auto-created locations land when no warehouse is specified.
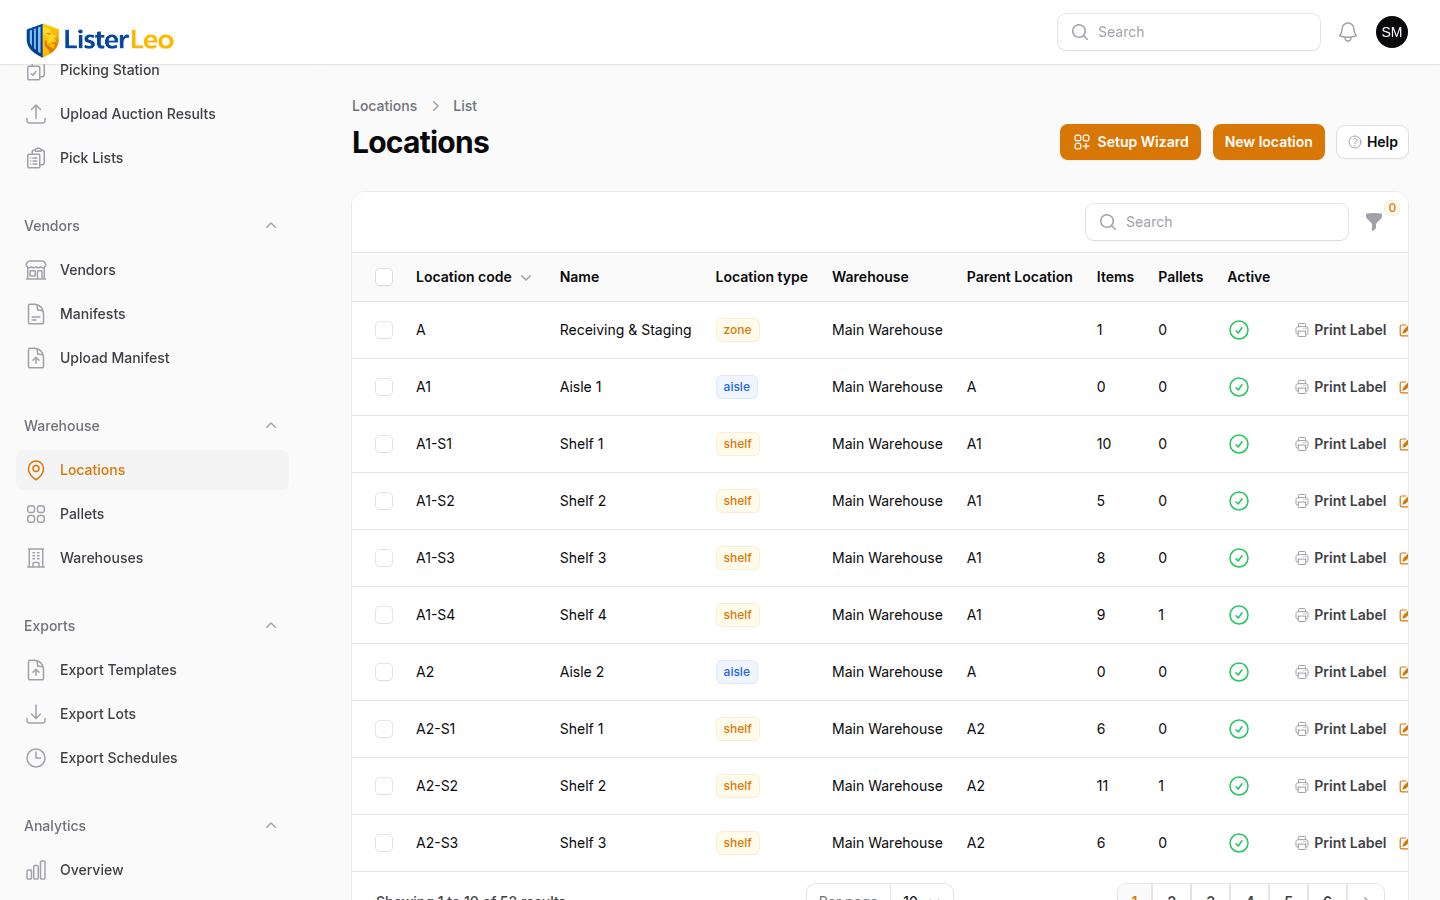
- Locations — Fixed positions in your warehouse. Each location has a type (Zone, Aisle, Shelf, or Bin) and an optional parent location, building up a hierarchy like Zone > Aisle > Shelf > Bin. The full address is stored in
location_code— wizard-generated codes look likeA(zone),A1(aisle),A1-S1(shelf),A1-S1-B1(bin). - Pallets — Mobile containers that hold multiple items and can be moved between locations. Items on a pallet inherit the pallet's location.
- Put-Away — The process of assigning scanned items to a location or pallet so they can be found later.
- Location Labels — Printed ZPL barcode labels affixed to shelves and bins for quick scanning during put-away and picking.

Setting Up Your Warehouse
org-adminBefore you can track item locations, you need to define your warehouse's physical layout. ListerLeo uses a four-tier hierarchy that can represent most warehouse structures.
Location Types
Each location has one of four location_type values, and optionally a parent location to nest under:
- Zone — The broadest grouping (e.g., "Zone 1", "Receiving Floor", "Back Wall").
- Aisle — A row within a zone (e.g., "Aisle A").
- Shelf — A horizontal level within an aisle (e.g., "Shelf 3").
- Bin — A single slot on a shelf (e.g., "Bin 12"). Items are typically scanned to the smallest level your warehouse uses — usually bin or shelf.
Not every warehouse needs all four levels. A small operation might only use shelves; a large one will use the full zone → aisle → shelf → bin chain. The full hierarchical code is stored in location_code.
Manual Location Creation
- Navigate to Warehouse > Locations.
- Click New Location.
- Pick the parent Warehouse, optional Parent Location, the Location Type (Zone / Aisle / Shelf / Bin), and a Location Number.
- Optionally provide a human-readable Name, a Barcode (printed labels fall back to
location_codewhen this is blank), and a Capacity. - Click Create.
For warehouses with hundreds of locations, use the Location Setup Wizard to generate the whole hierarchy in bulk. Operators can also scan a new label at the Put-Away Station and ListerLeo will auto-create a bin location in the default warehouse on the fly.
Location Setup Wizard
org-owner org-adminThe Location Setup Wizard (under Setup > Location Wizard in the navigation, restricted to org-owners and org-admins) generates a full warehouse hierarchy in bulk. It is a three-step wizard: Configure → Preview → Complete.
- Open Setup > Location Wizard.
- On the Configure step, pick the target Warehouse and enter how many of each tier you need:
- Zones — 1 to 26 (defaults to 3).
- Aisles per zone — 1 to 50 (defaults to 4).
- Shelves per aisle — 1 to 50 (defaults to 5).
- Bins per shelf — 0 to 50 (defaults to 0; leave at 0 if you don't track at the bin level).
- Optionally switch zone naming to Custom to provide your own zone labels.
- Click Generate Preview. The Preview step shows the proposed plan, totals per tier, and any conflicts with existing
location_codes. - Click Create {N} Locations (the label includes the total count). The Complete step gives you Print All Labels (sends ZPL to the configured Zebra printer), Download ZPL File, and a Copy All ZPL button.
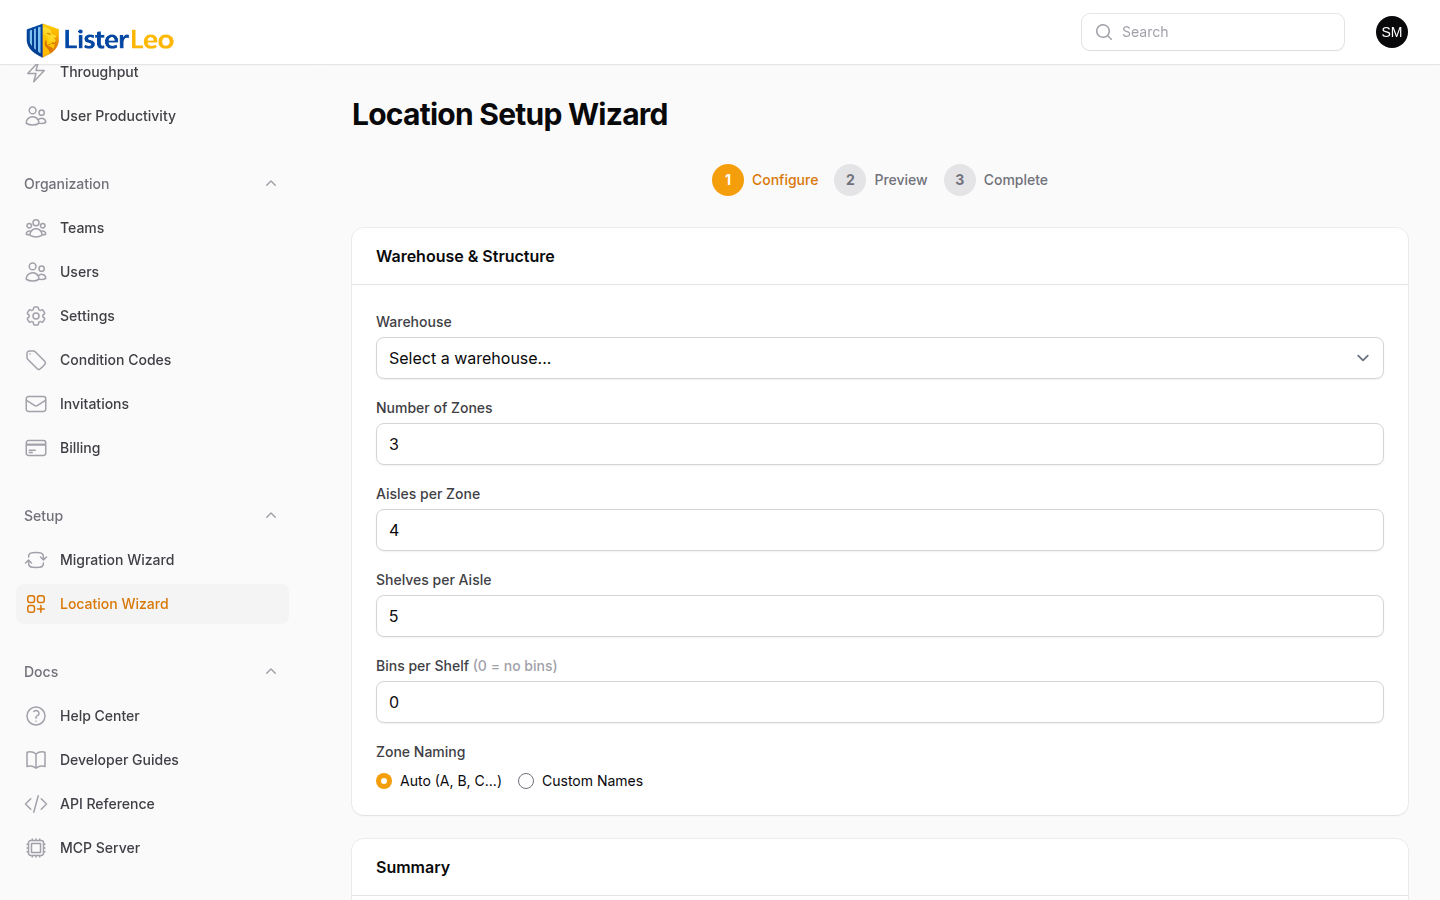
Locations created by the wizard are real records — deleting them is a row-by-row action from the Locations table. Plan your layout carefully before running the wizard. You can always add more locations later (manually or by re-running the wizard with different ranges).
Printing Location Labels
org-admin team-leadEach location needs a printed barcode label attached to the physical shelf or bin. These labels are scanned during put-away and picking to confirm the correct location.
Printing One Label
- Go to Warehouse > Locations.
- Find the location row and click the Print action — this dispatches the label to the configured Zebra (ZPL) printer.
- Or click View ZPL to open a preview modal with the raw ZPL and a PNG render (handy for grabbing the ZPL to print manually).
Printing the Whole Warehouse
After running the Location Setup Wizard, the Complete step exposes Print All Labels (sends ZPL for every newly created location) and a Download ZPL File button that streams the batch as a .zpl file.
Location labels are generated by LabelService::generateShelfLabel() and include the location_code as both human-readable text and a scannable barcode. ESC/POS templates exist in LabelService for item labels, but location labels print as ZPL.
Use large-format labels (3"x1" or bigger) for location barcodes so they are easy to spot and scan from a distance. Standard 2"x1" labels work for item barcodes but are tight for location markers.
Put-Away Station
scannerThe Put-Away Station is a dedicated scan-scan interface for assigning items to warehouse locations. Open it from Operations > Put-Away Station in the admin nav. It supports three modes selected via a mode switcher at the top of the page:
- Item → Location — Place an item directly into a warehouse location.
- Item → Pallet — Place an item onto a pallet.
- Pallet → Location — Move an entire pallet (and every item on it) to a location.
Each mode follows a two-step flow: scan the source (item or pallet), then scan the destination (location or pallet). The station auto-confirms as soon as the second scan resolves — no separate "confirm" button — and immediately resets for the next item, with a green success message (or red error) shown at the top.
- Open Operations > Put-Away Station.
- Pick the warehouse you're putting away into (auto-selected when there's only one or when one is flagged as default).
- Pick the mode and scan the source — an item by
serial_numberorbarcode, or a pallet bypallet_numberorbarcode. The source's current location/pallet is shown. - Scan the destination — a location by
barcodeorlocation_code, or a pallet bypallet_numberorbarcode. - The put-away is committed and the page increments the session counter, ready for the next scan.
The Put-Away Station works great with a wireless barcode scanner. Scan the item at your desk, walk to the shelf, and scan the location — no need to return to the computer between items.
Item to Location
scannerThe most common put-away method: placing a single item directly into a warehouse location.
- Set the mode switcher to Item → Location.
- Scan the item label (or type the item serial number / barcode).
- Verify the item details shown on screen match the physical item.
- Scan the destination location barcode (or its
location_code). - The item is moved to that location, its status is bumped to
put_awayif it was previouslyscannedorcataloged, and any prior pallet assignment is cleared.
If you scan a location that already contains items, the new item is added to that location. ListerLeo supports multiple items per location. To see the current contents of any location, open Warehouse > Locations and use the search/filter to find it.
If an item is already assigned to a location and you scan it into a new location, it will be moved. The old location assignment is replaced. The put-away event is tracked via the activity log and the analytics tracker.
Item to Pallet
scannerInstead of placing items directly on shelves, you can assign items to a pallet. The pallet itself is then placed at a location. This is useful for bulk goods that stay on their shipping pallet.
- Set the mode switcher to Item → Pallet.
- Scan the item label (or type the serial number / barcode).
- Scan a pallet barcode or
pallet_number. Auto-generated pallet barcodes follow the formatPLT-{ORG}-{0001}. - The item is assigned to the pallet, its
location_idis synced to the pallet's current location, and the pallet's item count and status auto-advance (empty → in_use). - Repeat for all items on the pallet. Retired pallets are rejected as destinations.
When the pallet is later moved to a location, all items on it inherit that location. See Pallet to Location below.
Pallet to Location
scannerMove an entire pallet (and all items on it) to a warehouse location in one step.
- Set the mode switcher to Pallet → Location.
- Scan the pallet barcode (or type
pallet_number/ barcode). The pallet's item count and current location are shown. - Scan the destination location barcode (or
location_code). - Every item on the pallet has its
location_idsynced to the new location in a single transaction.
If you need to move a pallet from one location to another, simply scan the pallet and then scan the new location. All items move automatically with the pallet.
Managing Pallets
team-lead org-adminPallets are managed from Warehouse > Pallets. The list shows pallet number, barcode, status (empty / in_use / full / retired), current location, and item count.
Creating a Pallet
- Navigate to Warehouse > Pallets.
- Click New Pallet.
- Enter a Pallet Number and Barcode (both required and unique). When you create pallets directly from the Put-Away Station the barcode is auto-generated in the format
PLT-{ORG}-{0001}; you only set these manually for legacy pallets you're importing. - Optionally pick a Location and status, and add internal notes.
- Click Create.
- Print the pallet label and affix it to the physical pallet.
Row Actions on the Pallets List
- Export Manifest — Streams a CSV of every item on the pallet (only shown when the pallet has at least one item).
- Print — Sends the pallet's ZPL label to the configured Zebra printer.
- View ZPL — Opens a modal showing the raw ZPL for the pallet label.
- Dissolve — Removes every item from the pallet (items keep their current location), marks the pallet retired, and soft-deletes it.
- Edit / Delete — Standard Filament actions for opening the pallet detail page or soft-deleting it.
Pallet Detail Page
Clicking a pallet row opens the edit page, which has a Pallet tab (the form) and an Items on Pallet relation manager listing every item currently on the pallet. The header includes the same Export Manifest action.
The exported CSV contains: Pallet Number, Pallet Barcode, Pallet Location, Serial Number, Item Barcode, Title, Brand, Size, Color, Condition, Quantity, Lot #, Vendor, Auction, Item Location, Status, Scanned At.
Put-Away on Mobile
scannerThe ListerLeo mobile app includes a full Put-Away workflow that uses your phone's camera as a barcode scanner. This is the most efficient way to do put-away since you can walk through the warehouse with just your phone.
- Open the ListerLeo mobile app and navigate to Put-Away.
- Scan the item's barcode label.
- Scan the destination — a pallet, a shelf/bin/row barcode, or a brand-new label that has never been registered.
- The app confirms the put-away with haptic feedback and a green checkmark.
When you scan a destination label the backend has never seen, the mobile API auto-creates a bin location in the org's default warehouse using the scanned value as both location_code and barcode. That means warehouses with pre-existing shelf labels work without re-labeling — just start scanning. (The desktop Put-Away Station does not auto-create; it rejects unknown destinations so admins can keep tighter control over what gets created.)
For detailed mobile put-away instructions, see Mobile App > Put-Away.
Finding Items in the Warehouse
All UsersYou can find where any item is stored using multiple search methods.
- Item Detail Page — Open any item and look at the Location field to see its current warehouse position. When the item is on a pallet, the effective location resolves through the pallet.
- Items List — Open Items from the navigation. The Location column shows each item's
location_code, and the Status filter lets you focus on Scanned (not yet put away), Cataloged, Put Away, etc. - Location Contents — Navigate to Warehouse > Locations, search for a location, and the Items count column shows how many items it holds.
- Pallet Contents — Open Warehouse > Pallets → a pallet to see every item on it in the Items on Pallet tab.
- Scan Lookup — In the Put-Away Station, scanning an item label shows its current location and current pallet without committing a move.
If an item shows no Location it has not been put away yet. Filter the Items list by status Scanned or Cataloged to find items that still need to be stored.