Organization & Admin
Configure your organization, manage users and teams, and customize ListerLeo for your operation.
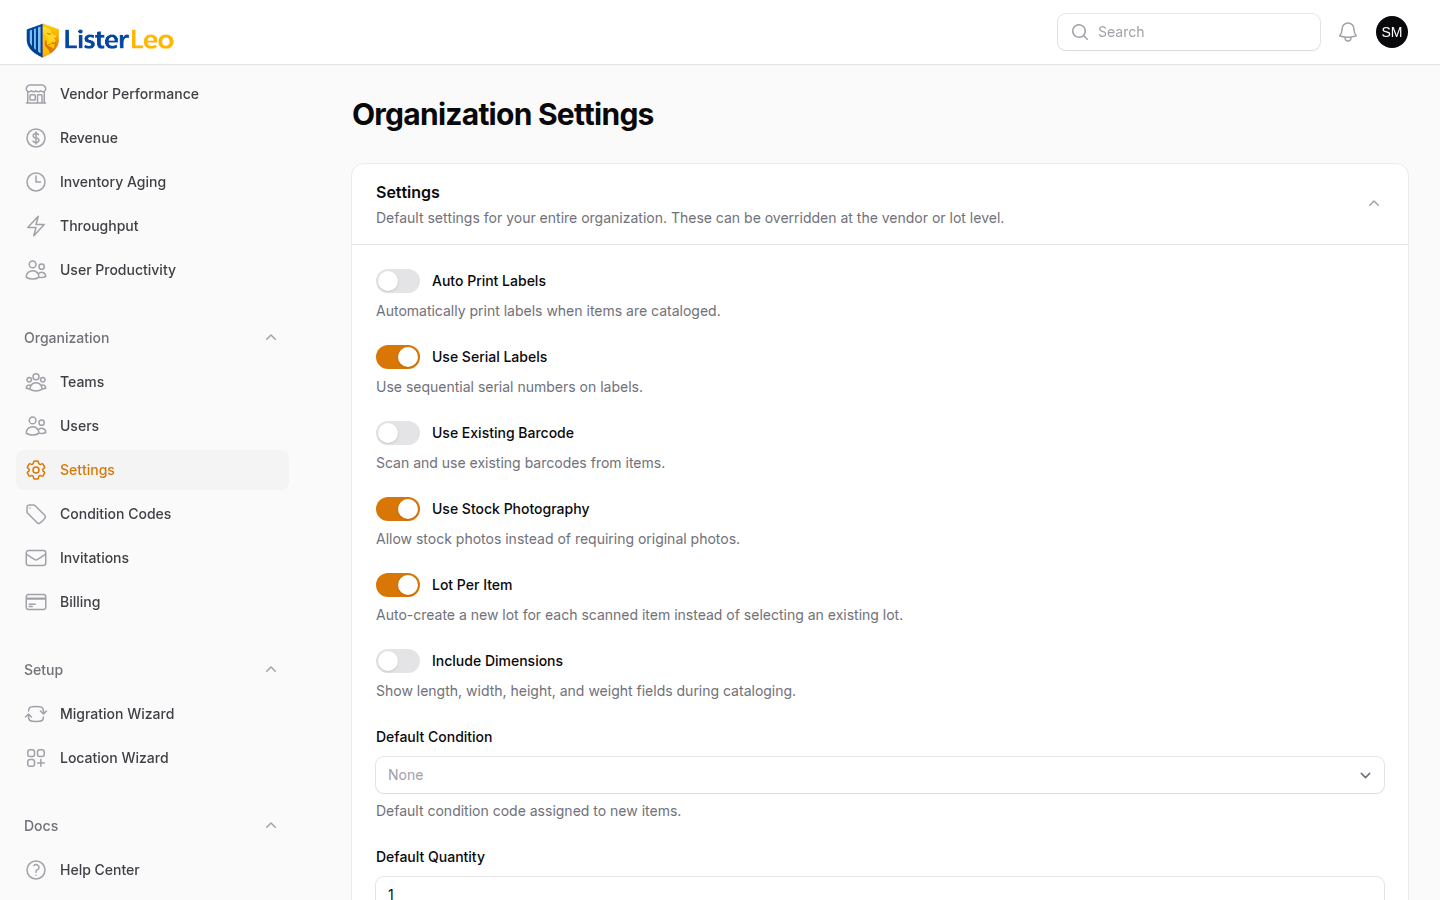
org-admin org-ownerOrganization settings control the global behavior of ListerLeo for your entire team. These settings serve as defaults that can be overridden at the auction, vendor, or lot level through the settings cascade (Lot → Parent Lot(s) → Vendor → Auction → Organization → System Default).
Organization Profile (Name & Slug)
Open the tenant switcher in the top-right of the admin panel and choose Organization Profile. From there you can edit:
- Organization Name — Displayed across the interface and on exports.
- Slug — URL-safe identifier used in the admin URL (
/admin/{slug}/...).
Cascading Settings
All other organization-wide defaults live under Organization > Settings in the left sidebar. This page edits the organization's settings JSON via the cascading-settings form (see Cascading Settings below).
Auction Defaults
The Organization Settings page also exposes auction-level defaults that pre-fill when you create a new auction (used unless overridden on the Vendor or Auction):
- Default Buyer's Premium (%) — Applied to new auctions when the vendor has none.
- Default Timezone — IANA timezone used for new auctions when the vendor has none.
- Default Pickup Location — Address pre-filled on new auctions.
- Default Auction Terms — Long-form terms & conditions inserted into new auctions.
There are no organization-wide "default starting bid / reserve / buy now" inputs — per-item bid pricing is configured under the Vendidit export defaults (Vendidit MSRP %, Vendidit Reserve Calc, etc.) or set at the lot/item level.
Cascading Settings
org-adminListerLeo uses a cascading settings system that resolves configuration values through a chain of precedence. This is one of the most powerful features of the platform — it lets you set defaults at a high level and override them only where needed.
The Settings Cascade Chain
When ListerLeo needs a setting value, it checks these levels in order, using the first non-null value it finds:
- Lot — A value set on the lot the item belongs to. Highest priority.
- Parent Lot(s) — Walks up parent lots if the lot has one.
- Vendor — A value set on the vendor the lot came from.
- Auction — A value set on the auction the lot belongs to.
- Organization — The organization-wide default.
- System Default — The built-in fallback from
SettingsCascadeService::SETTING_DEFINITIONS. Lowest priority.
Think of the cascade like a waterfall. The most specific level (Lot) wins; if it has no value, the lookup walks up to its parent lot, then the vendor, the auction, the organization defaults, and finally the System Default. Set values only at the most specific level needed.
Settings That Cascade
Cascading settings are stored on each level's settings JSON column. The full list is defined in SettingsCascadeService::SETTING_DEFINITIONS and includes:
- Workflow — Workflow steps (photograph / describe / measure / condition / price / review / publish / etc.), use existing barcode, use stock photography, include dimensions.
- Labels — Auto-print labels, use serial labels, serial prefix, default label template.
- Defaults — Default condition code, available condition codes, default quantity.
- Auction defaults — Buyer's premium %, timezone, pickup location, auction terms.
- Vendidit Auctions export — Bidding type, pickup/shipping, MSRP %, opening-bid calculation, reserve calculation, package dimensions and weight.
Note: there are no cascading "starting bid / reserve / buy now" scalar fields — auction bid values are derived from the Vendidit MSRP/reserve calculations or set per-item via the export form.
Inherited Value Hints in Forms
When you edit a Vendor, Auction, or Lot's cascading settings, each field shows helper text like "Inherits Off from Organization" when the field is left blank — so you can see what value will be used and where it comes from before saving.
Workflow Settings
org-adminWorkflow settings define which steps appear in the cataloging flow at the Scanning Station. They are configured under Organization > Settings (the workflow_steps setting) as part of the cascading settings system.
Configuring Workflow Steps
- Navigate to Organization > Settings.
- Tick the steps you want enabled under Workflow Steps. The available choices are:
- Single Screen — Use a single-screen cataloging form instead of a multi-step wizard.
- Photograph — Capture or upload photos of the item.
- Describe — Enter / AI-generate a description.
- Measure — Capture dimensions and weight.
- Condition — Pick a condition code.
- Price — Set price / estimated value.
- Review — Final review before saving.
- Publish — Mark the item ready for auction.
- Force Putaway — Require a put-away location before completing the item.
- Click Save Settings.
Workflow steps follow the cascading settings chain, so they can be overridden at the auction, vendor, or lot level. Leave the field empty at a non-org level to inherit from the parent.
Enabling more steps improves data quality but slows scanning. Many teams enable only Photograph, Condition, and Review, leaving describe/measure for catalogers to fill in later.
Label Settings
org-adminLabels are configured in two places: org-wide label behavior lives under Organization > Settings (cascading), and the actual label designs live under Setup > Label Templates.
Cascading Label Settings
Under Organization > Settings:
- Auto Print Labels — Automatically print a label when an item is cataloged.
- Use Serial Labels — Use sequential serial numbers on labels.
- Serial Prefix — Optional prefix added to serial numbers (max 20 chars).
- Label Template — The default
LabelTemplateto use.
All four settings cascade: a Vendor, Auction, or Lot can override them.
Label Templates
Under Setup > Label Templates, each template has:
- Type — Item/Serial, Shelf/Location, Pallet, or Login Badge.
- Format —
ZPL (Zebra)for thermal label printers orESC/POS (Receipt)for receipt-style printers. - Dimensions — Width and height in millimetres.
- Design — Built in the visual label designer; element positions are compiled to ZPL at print time.
The Label Designer has a live ZPL preview rendered through the Labelary web service. Verify formatting and alignment in the preview before assigning a template as the org default.
Managing Users
org-admin org-ownerThe user management page shows all members of your organization with their active status.
User List
Navigate to Organization > Users. Each row shows:
- User name and email
- Active indicator — a tick / cross icon reflecting the
is_activeflag (edit the user to toggle it) - Created date
Role and team are not columns in the list view — open a user to see / edit them. A Trashed filter at the top of the list lets you find soft-deleted users.
User Actions
- Edit — Change the user's name, email, password, roles, and teams.
- Print Login Badge — Re-prints the user's
login_barcodeso they can scan-to-login on the mobile app. - Deactivate — Toggle Active off on the edit form. Inactive users cannot log in (web or mobile) but their data and historical attribution are preserved.
- Delete / Force Delete — Soft-delete the user with the Delete action; the Force Delete action removes them permanently. Soft-deleted users can be restored from the trashed filter.
Users are scoped to one organization. The same email address cannot exist in two organizations — inviting an existing user's address from a different org will fail. Changing a user's password automatically rotates their mobile login barcode.
Inviting Users
org-adminInvite new team members to join your organization via email. Self-registration creates a new organization, not a join — existing organizations only grow through invitations.
- Navigate to Organization > Invitations.
- Click New invitation.
- Enter the recipient's email address (it is normalised to lowercase).
- Pick a Role:
org-admin,team-lead,cataloger,scanner, orviewer. (Team assignment happens later from the Users page.) - Click Create.
When you create an invitation, a real User row is provisioned immediately so the invitation email can embed the recipient's login barcode — they can scan-to-login on the mobile app instantly without having to set a desktop password. If they want web access, the accept link lets them set a name and password.
Invitations expire after 7 days. Use the Resend action on any pending or expired invitation to refresh the token and re-send the email; the underlying user and login barcode stay the same.
Inviting an email that already belongs to a user in a different organization fails with an error — users are scoped to one tenant. The Invitations page only invites one address at a time; bulk comma-separated invites are not supported in the UI.
Assigning Roles
org-admin org-ownerRoles are managed via Spatie Laravel Permission in teams mode. A user can hold multiple roles simultaneously.
Available Roles
org-owner— Full access to everything in the org, including billing. Exactly one per organization (the registering user, by default).org-admin— Everything except billing (organization.manage-billing).team-lead— Manages lots, items, exports, manifests, pick lists, and task assignments for their team(s). No user/team CRUD, no vendor/warehouse CRUD, no billing.cataloger— Creates and edits items, runs cataloging, views lots and pallets. No exports, no team management.scanner— Scans items only. Read-only on most other resources.viewer— Read-only across the platform.
Changing Roles
- Navigate to Organization > Users.
- Click the row to edit the user.
- In the Access section, add or remove role names in the Roles multi-select.
- Click Save changes.
Role changes take effect on the user's next page load — they do not need to log out and back in.
Managing Teams
org-adminTeams group users for analytics filtering, lot assignment, pick-list scoping, and team-level resource locks.
Creating a Team
- Navigate to Organization > Teams.
- Click New team.
- Enter a name (e.g., "Morning Shift", "Electronics Team"). The slug auto-generates from the name.
- Optionally add a description and configure Vendor & Lot locks (see Team Locks below).
- Click Create.
After creating the team, add or remove members from the team's edit page via the Users relation manager — or assign teams when editing each user. A user can belong to multiple teams; the team picker on the User form is multi-select.
Organize teams by shift, physical location, or function (scanning team, picking team). This makes analytics more meaningful and helps with resource allocation.
Team Locks
org-adminTeam locks restrict a team's members to specific vendors or lots. This is useful for organizations with multiple teams that should not interact with each other's data.
What Can Be Locked
- Locked Vendors — When set, members of this team only see lots / items belonging to these vendors.
- Locked Lots — Restrict the team to specific lots. Tighter than vendor lock — useful for "this seasonal team only works on these 3 lots". Combined with vendor lock the locks intersect (must match both).
Locks are configured on the Team — open Organization > Teams, edit a team, and use the Vendor & Lot Locks section. The lot picker only lists lots in draft, cataloging, or ready status. Leave both fields empty for unrestricted access.
Org-owners and org-admins are not restricted by team locks. The locks apply to the team's members when scoping what lots/items they see in lists, on pick lists, and in the mobile app.
Condition Codes
org-adminCustomize the condition codes available in your organization. Condition codes describe the physical state of items and appear in auction listings.
Managing Condition Codes
- Navigate to Setup > Condition Codes.
- You will see the current list with each code's sort order and active state.
- To add a code: click New condition code, enter a short Code (max 10 chars, e.g.
USED), a friendly Name, an optional description, and a Sort Order (lower appears first). Click Create. - To edit a code: click the edit icon, modify the fields, and save. Note that changing the
codeon a code with existing items leaves orphaned references — keep the code stable. - To reorder codes: drag rows in the list view (it is reorderable on
sort_order). - To disable a code: toggle Active off. Inactive codes are hidden from the condition picker but stay queryable on existing items.
Order your condition codes from most-common to least-common (sort_order starts at 0). The most-used code at sort_order=0 will be the default suggestion in the cataloging form.
The list view supports a bulk delete action, but deleting a condition code that is in use will orphan references on existing items. When retiring a code, prefer setting it inactive.
Billing
org-ownerThe billing page is visible to all signed-in members of the organization, but only users with the organization.manage-billing permission (in practice, the org-owner) can subscribe, change payment, or cancel. Everyone else sees a read-only summary directing them to the owner.
Pricing
ListerLeo bills a flat per-seat subscription via Stripe (Laravel Cashier). There are no tiered plans:
- Base subscription — $119 / month, includes one user.
- Additional seats — $39 / month per additional active user. Seat count updates automatically when you invite or deactivate users.
- Free trial — New organizations get a free trial (capped at 10 seats) before a subscription is required.
Billing Page
- Navigate to Organization > Billing.
- The page shows the current status (Active / Free Trial / Past Due / Canceled / No Subscription), trial days remaining, active seat count, and the monthly pricing breakdown.
- If unsubscribed or on trial, click Subscribe Now to start a Stripe Checkout session.
- If active, click Manage Payment Method to open the Stripe customer portal (where invoices, receipts, and payment methods live) or Cancel Subscription to cancel.

If the trial expires without a subscription, non-owners are redirected to the billing page and the rest of the admin panel and mobile app are locked. Past-due subscriptions trigger the same lockout.