Picking & Fulfillment
After items sell at auction, pick lists guide your warehouse team to retrieve them from storage for buyer fulfillment.
team-lead scannerA pick list is a collection of sold items that need to be retrieved from their warehouse locations. When an auction closes and buyers pay, a pick list directs your warehouse team to the exact item locations.
Pick List Workflow
- An auction closes and results are imported (sold items are matched by serial number).
- An org-owner, org-admin, or team-lead marks items as sold — either via the Mark as Sold bulk action or by uploading an auction results CSV. Both paths create or append to a pick list.
- The Picking Station loads the list with items sorted by warehouse location for efficient walking.
- A picker opens the Picking Station and works through the list, scanning each item's serial number or barcode as they pull it.
- The pick list auto-advances to
in_progresson first scan andcompletedwhen every item is picked.
Creating Pick Lists
team-lead org-adminPick lists are not built by hand item-by-item — they're produced by marking items as sold. There are two ways to do that.
From the Mark as Sold bulk action
- Open an Auction (or the Auction Items / Lots resource) and select the rows you want to mark sold.
- Click the Mark as Sold bulk action.
- In the modal, pick one of three pick-list modes: Just mark sold — no pick list, Add to an existing pick list (only non-completed lists are offered), or Create a new pick list (the default).
- If creating a new list, name it — defaults to "Pickup – YYYY-MM-DD".
- Optionally pick an Assign to (optional) user (any active user in your organization).
- Optionally set a Sold price (optional, applied to all). Leave blank to keep each item's existing sold price.
- Click Mark Sold. The items are stamped
status = soldand a pick list is created or updated in one transaction.
Only org-owner, org-admin, and team-lead see this action.
By Uploading Auction Results
Uploading a results CSV automatically marks matched items sold and creates a pick list named after the platform and timestamp (e.g. "HiBid Results - 2026-05-18 14:30"). See Uploading Auction Results below.
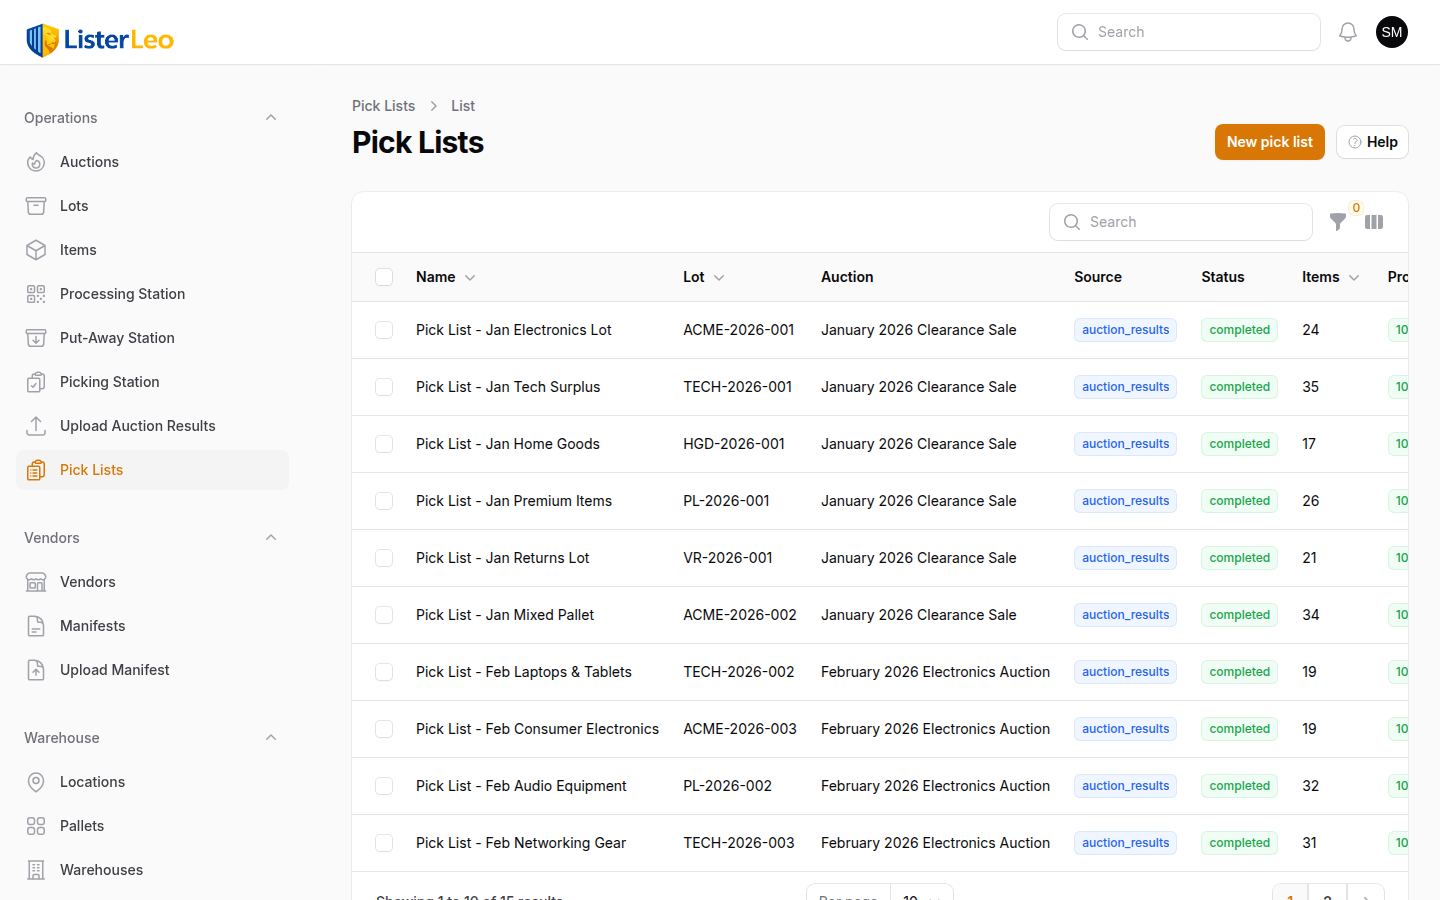
Managing pick lists in the admin panel
Open Warehouse > Pick Lists to see every list, filter by status (pending, in_progress, completed) or source (HiBid, Proxibid, AuctionZip, Vendidit Auctions, Manual), and reassign the Assigned To picker. The Pick Lists table also shows live progress as a percentage badge.
The Picking Station loads items sorted by their expected location, so pickers naturally walk an efficient route.
Uploading Auction Results
team-lead org-adminAfter an auction closes on your platform, download the closed-lots CSV and import it into ListerLeo. The parser supports HiBid, Proxibid, AuctionZip, and Vendidit Auctions (and will auto-detect the format from the column headers).
- Download the results CSV from your auction platform.
- Upload it into ListerLeo's auction results importer.
- ListerLeo matches each row to an AuctionItem by
serial_numberorbarcode— not by lot number. Only rows whose status column reads sold/won/closed/paid/etc. are processed. - Matched items are updated to
status = sold, theirsold_priceis recorded, and they're appended to a freshly-created pick list named "<Platform> Results - YYYY-MM-DD HH:MM". - Unmatched serial numbers are returned in the result and logged so you can investigate (item never scanned, mistyped serial, etc.).
Matching is by serial number / barcode, not by lot number. The platform's lot number column is ignored. If items weren't scanned (so no serial exists in ListerLeo), they will land in the unmatched list.
Picking Station
scannerThe Picking Station is a scan-driven Livewire interface that walks pickers through a pick list. It shows every item on the list, sorted by expected location, with a scan input at the top to mark items picked.
- Navigate to Operations > Picking Station.
- Select an active (
pendingorin_progress) pick list from the dropdown. On selection, apendinglist auto-advances toin_progress. - The full list of items renders, sorted by expected location, with each item showing its serial number, title, location, sold price, and buyer info.
- Scan the item's serial number or barcode into the focused scan input.
- On a match, the item flips to picked, the scan input clears and re-focuses, and the progress percentage updates.
- Repeat until every item is picked. The pick list auto-completes when progress hits 100%.
If the Master Controller has assigned this user a picking task, the Picking Station auto-selects the assigned list on mount and locks the dropdown.
Scanning Picks
scannerScanning confirms that you have physically retrieved the correct item. ListerLeo looks up the scanned value against auction_items.serial_number and auction_items.barcode.
Scan Outcomes
- Picked: <item title> — The scan matched an item on this pick list. A green full-screen overlay shows the message, the row flips to picked, and progress updates.
- No item found: <serial> — No
AuctionItemin your org has that serial or barcode. Red overlay. - Not on this pick list: <item title> — The item exists but isn't on the currently selected list. Red overlay.
- Already picked: <item title> — Someone (you or another picker) already scanned this item. Red overlay.
If you consistently find items not at their expected locations, it may indicate a put-away problem. Review the Put-Away Analytics to identify patterns.
Pick List Progress
team-lead All UsersTrack pick list progress from the Warehouse > Pick Lists index. Each row shows live progress (picked / total) as a percentage badge that changes colour from gray (0%) to warning (in progress) to success (100%).
Columns shown on the Pick Lists table
- Name — Operator-facing pick list name.
- Lot — Lot number when all items share a single lot.
- Auction — Auction name when known.
- Source —
hibid,proxibid,auctionzip,vendidit, ormanual. - Status —
pending,in_progress, orcompleted. - Items — Total items on the list.
- Progress — Percentage picked.
- Assigned To — Optional named picker, or "Unassigned".
Concurrent Picking
team-leadMultiple users can work from the same pick list simultaneously. On the mobile API path, an item is claimed by the first picker who fetches it (claimed_by / claimed_at stamped on the PickListItem), and other pickers see remaining unclaimed items. Already-picked items return an "Already picked" feedback message on subsequent scans.
Concurrent picking works best when pickers use the mobile app, since each picker carries their own device and scans independently. See Picking on Mobile.
Picking on Mobile
scannerThe mobile app is the most practical way to pick items, since you walk through the warehouse with the device in hand.
- Open the ListerLeo mobile app and tap into the Picking feature.
- Select a pick list from the list of available pick lists.
- The Pick Active screen opens with a scan input field and a camera-scan fallback.
- Type the serial number, scan from a hardware scanner, or tap the camera icon to scan a barcode.
- Successful picks flash a green overlay with the item title; wrong / unknown items flash a red "Wrong Item" overlay.
Staging Picked Items
scanner team-leadAfter picking, items need to be organized for buyer pickup or shipping. ListerLeo supports staging areas where picked items are grouped by buyer or lot.
- Create staging locations in your warehouse (e.g., "STAGING-A", "STAGING-B") using the normal location setup.
- During or after picking, scan items to their staging location.
- When a buyer arrives or a shipment is prepared, use the staging location to quickly identify all their items.
Name your staging locations with buyer information (e.g., "STAGING-SMITH-12345") or use numbered staging bins that you can communicate to buyers ("Your items are in Staging Bin 7").